FDM on Stratasys machines
Design Guidelines
Fused deposition modeling builds a part from the bed up, one bead of plastic at a time. The bead has a width, and each new layer has to stick to the one under it. Anything thinner than that bead, or anything that asks the layers to hold a load they were not laid for, is what fails first. The sizes below are starting points for a part that prints cleanly and stays together in use.
Walls
Wall thickness
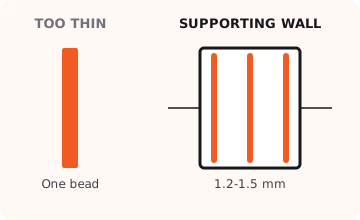
A supporting wall should be at least 1.2–1.5 mm thick, about 0.047–0.06 in. That is enough for an outer contour and plastic between the faces, instead of a wall that is only the skin of one bead.
A one-bead wall wanders, looks unfinished, and breaks if anything leans on it. A closed shape, such as a tube or a box, holds its size better than a free-standing line, because the bead comes back around and locks the loop.
Build direction
Orientation
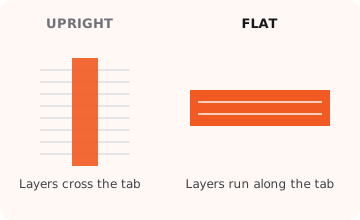
Every FDM part is a stack of layers. The plastic is strongest along a bead and weakest where one layer is only stuck to the next. A tab, a pin, or a boss that sticks up through that stack can peel apart between layers.
For the best print orientation, one side of the part should be fully flat. That face sits on the build plate and is what holds the part down for the whole build. A rounded or pointed bottom has little area to affix, so the part can loosen as it grows.
Round features and fine details also resolve better when the layers run across them, in the flat plane of the bed. If several fragile features can share one direction, the part can be stood so those features build flat. The quote viewer lays the part down for you, but a model drawn with the important faces already in one direction gives that choice a better start.
Openings
Holes
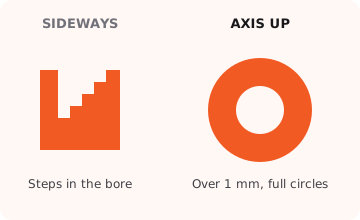
Keep a hole larger than about 1 mm (0.04 in) if it needs to stay round. Smaller than that, the bead cannot turn the corner and the opening prints as a notch or closes up.
Direction matters as much as size. A hole whose axis points up is drawn as a full circle on every layer, so it stays round. A hole that runs sideways is sliced into steps, so the bore looks faceted and usually prints undersize. If a fastener hole has to be accurate, leave it slightly small and drill it after printing.
Lettering
Text and small details
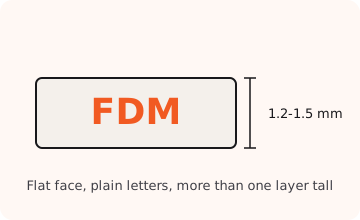
Raised or recessed lettering has to be thick enough for a bead and tall enough for more than one layer. Use at least 1 mm of stroke width, and about 1.2–1.5 mm of height. Below that, the letters either never appear or break off at the first handling.
Use a plain, open typeface. Condensed or very light fonts fill in. Put the words on a face that builds flat, so each layer stacks squarely on the last instead of smearing the characters as the slope climbs. The same rule covers logos, slots, and any other detail near the width of the bead.
Clips
Tabs
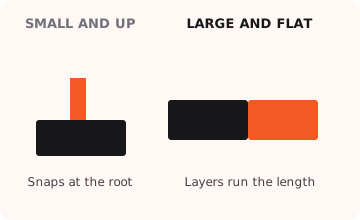
A tab is a lever on a small root. On a large part, that root is where it snaps, often while the part is still being taken off the build sheet. Make the tab as large as the fit allows, both thicker and longer, so the load is not sitting on one layer bond.
Print the tab flat, with the layers running along its length. If the design forces the tab to stand up, print the tab as its own piece in the strong direction and fit it into a pocket afterward. A replaceable tab is easier to reprint than the whole housing.

Stiffeners
Ribs
A rib is a better stiffener than a huge fillet when a wall has to stay light. It takes the bend out of the wall by sharing the load over a longer line of plastic. Follow the same thickness rule as a supporting wall, and do not go under 1.5 mm (0.06 in), so several beads can sit inside the rib.
A rib thinner than that either fails to fill, or it prints and then cracks where it meets the wall. Keep the rib shorter than the wall it braces, and tie it into both faces so it is not a loose fin.
Ramps
Slope angle
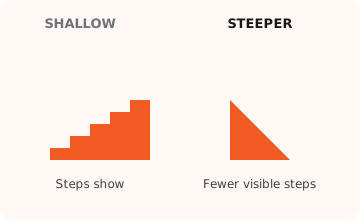
The machine cannot print a smooth ramp. It prints a stack of flat layers, and a shallow angle turns those layers into a staircase you can see and feel. The lower the angle, the wider each step, and the more the surface looks terraced.
A steeper face hides the steps because each layer steps in only a little. If a show surface has to be a long, low slope, plan on sanding it, or break the slope into a steeper face and a flat. Overhangs that lean out too far also need support, and that support leaves a rougher face where it was removed.
Edges
Knife edges
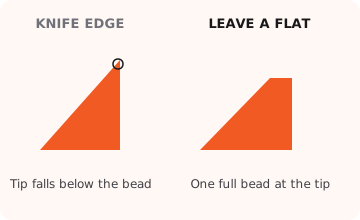
A sharp edge tapers until it is thinner than the bead. The last bit of that tip does not print, or it prints as a curl that breaks off. The part then ends short of the model, and the edge is unpredictable from one build to the next.
Leave a small flat on the tip, at least one bead wide. The edge still looks crisp, and the machine has something solid to finish on. The same idea applies to needle points, feathered ends of ribs, and blades drawn to a zero thickness.

Interior
Infill
The outside of an FDM part is a solid shell: contours around the sides, and solid layers on the top and bottom. Only the interior changes. Sparse leaves the widest air gap and the least weight. Double Dense crosses the beads into a grid, so the part is stiffer and still mostly air. Hexagonal packs that interior tighter. Solid presses the beads together and is the heaviest, strongest choice.
On a bulky part, the interior is most of the weight, so Sparse can take a large share of it out. On a thin plate, the shell is already most of the plastic, and the infill change is small. Solid still has tiny voids where beads meet, so a printed part is not watertight as it comes off the machine. The percent for each material is on the infill page.
